
WYSIWYG text editing and TinyMCE
Description
WYSIWYG text field editor programming in Plone.
- Introduction
- Disabling HTML filtering and safe HTML transformation
- Content linking
- Editor preferences
- Applying styles only edit view
- Customizing TinyMCE options
- Custom field-specific style list for TinyMCE
- Rich text transformations
- Hacking TinyMCE Javascript
- TinyMCE plug-ins
- Adding a new plug-in
- Customizing existing plug-in
- Ploneboard and anonymous editor
- TinyMCE shortcuts
Introduction
Plone supports TinyMCE (default), Kupu and CKEditor.
TinyMCE and Plone integration is distributed in Products.TinyMCE package.
Disabling HTML filtering and safe HTML transformation
By default Plone does HTML filtering to prevent cross-site scripting attacks. This will make Plone to strip away from HTML
- <script> tags
- Some other potentially unsafe tags and attributes
If you need to put a <script> tag on your content text in TinyMCE you can disable this security feature.
Warning
If you don't trust all of your site editors, then this will open your site for an attack.
Step 1: Turn off Plone’s safe_html transform. Go to /portal_transforms/safe_html in the ZMI, and enter a 1 in the ‘disable_transform’ box. This prevents Plone from removing tags and attributes while rendering rich text.
Step 2: Set the "X-XSS-Protection: 0" response header. This can be done in your frontend webserver such as apache or nginx. Alternatively, if you only need to disable the protection for users who have permission to edit, you can add this to the site’s main_template:
tal:define="dummy python:checkPermission('Modify portal content', context) and request.RESPONSE.setHeader('X-XSS-Protection', '0');"
More info
Content linking
Plone offers many kind of support and enhancements in site internal content linking
- Delete protection: warning if you try to delete content which is being referred.
- Migrating of links when the content is being moved
The recommended method for linking the content is Linking by UID since Products.TinyMCE version 1.3.
- When the text is saved in TinyMCE all relative links are converted to UID links in the saved HTML payload
- When the text is displayed again, the HTML is run through output filter and UID links are converted back to human readable links
This solves issues with earlier Plone versions where the link targets become invalid when a HTML textfield with relative links where shown on the other page as the original context.
Note
You might need to turn on Linking by UID setting on in the site setup if you are migrating from older Plone sites.
Editor preferences
Plone supports user text changeable editor. The active editor is stored in the user preferences.
The user can fallback to hand-edited HTML by setting active editor to none.
The rich text widget can also support optional input formats besides HTML: structured text and so on.
Text format selector
The format selector itself is rendered by
wysiwyg_support.pt
macros which is Plone core
Applying styles only edit view
You can use TinyMCE body selector make your CSS class have different styles in view and edit modes (inside TinyMCE)
/* Break columns in two column layout
 *
 * https://developer.mozilla.org/en/css3_columns
 *
 */

.column-breaker {
        column-break-before: always;
        display: block;
}

.mceContentBody .column-breaker {
        color: red;
        border: 1px dashed red;
        display: block;
}
Note
Firefox does not actually support column breaks, so this was useful headaching experience.
Customizing TinyMCE options
In your add-on code, all TinyMCE options in the control panel can be exported and imported using GenericSetup, portal_setup and tinymce.xml.
Hacking TinyMCE Javascript
Plone ships with pre-compressed TinyMCE source code enabled by default.
If you want to toy around with TinyMCE source code itself, you might want to first enable the usage of debug version of TinyMCE source.
In
Products.TinyMCE.skins
open tiny_mce_src.js and copy-paste its content into
tiny_mce.js.
Note
Replacing tiny_mce.js with tiny_mce_src.js in portal_javascripts doesn't seem to work as it breaks TinyMCE plug-in loading.
TinyMCE plug-ins
TinyMCE consists of plug-ins. Existing plug-ins can be overlaid with your custom version by loading Javascript after core TinyMCE load.
- Default TinyMCE plug-in Javascript files can be found under Products.TinyMCE/skins/tinymce/plugins
- Usually TinyMCE plug-ins dialogs load in <iframe> and HTML code loads separate CSS and JS files from the main site
Adding a new plug-in
Here are instructions how to add new buttons to TinyMCE
Some rules
-
Plug-in id goes to
tinymce.xml -
Your plug-in must be in a file called
editor_plugin.jsin skins layer - You must have a skins layer folder named after your plug-in id
- You don't register plug-in Javascript portal_javascripts
- TinyMCE button row is in the main document. However, the edit area itself is in <iframe>. Also, many of TinyMCE dialogs are launched in <iframe> and they load a hardcoded set of Javascript files (they don't use any kind of Plone master template or <head> section).
So in the end you'll have a file:
yourcompany.app./yourcompany/app/skins/tinymce_plugin_flowplayer/flowplayer/editor_plugin.js
Why all this? I don't know. And honestly, in this point, I don't care.
Register your specially named skin layer in
skins.xml:
<?xml version="1.0"?>
<object name="portal_skins" meta_type="Plone Skins Tool">


 <object name="tinymce_plugin_flowplayer"
    meta_type="Filesystem Directory View"
    directory="your.app:skins/tinymce_plugin_flowplayer"/>

 <skin-path name="*">
  <layer name="tinymce_plugin_flowplayer"
     insert-after="custom"/>
 </skin-path>

</object>
Register your plugin in
tinymce.xml
GenericSetup install profile
<?xml version="1.0"?>
<object>

 <toolbar>
  <customtoolbarbuttons purge="False">
    <element value="flowplayer"/>
  </customtoolbarbuttons>
 </toolbar>

 <resourcetypes>

  <customplugins purge="False">
    <element value="flowplayer"/>
  </customplugins>
Then finally drop a
editor_plugin.js
to your plug-in folder
/**
 * a TinyMCE plug-in for opening a dialog asking a video link and creating Flowplayer code out of it
 *
 */

(function() {

    tinymce.create('tinymce.plugins.FlowplayerPlugin', {

        init : function (ed, url) {

            var t = this;
            t.url = url;
            t.editor = ed;
            t.docs = false;

            ed.addButton('flowplayer', {
                title : 'Video',
                cmd : 'flowplayer',
                image : url + '/img/flowplayer.gif'
            });

            ed.addCommand('flowplayer', function (val, page) {
                var url = prompt("Copy-paste URL to MP4 video file", "");
                // note: flowplayer link must not have text inside
                html = '<a class="flow-player tinymce-flow-player" href="' + url + '" />';
                ed.execCommand('mceInsertContent', false, html);
            });

            //ed.onPostRender.add(t._setupTOC, t);
        },

        getInfo : function () {
            return {
                longname : 'collective.flowplayer video insert plug-in ',
                author : 'Mikko Ohtamaa',
                authorurl : 'http://webandmobile.mfabrik.com',
                infourl : 'http://webandmobile.mfabrik.com',
                version : "1.0"
            };
        }
   });

   tinymce.PluginManager.add('flowplayer', tinymce.plugins.FlowplayerPlugin);
})();
Media resources
TinyMCE exposes URL to your plug-in base folder, where
editor_plugin.js is, as plug-in
init()
parameter.
You can construct relative URLs to set media resources
in
init().
ed.addButton('flowplayer', {
    title : 'Video',
    cmd : 'video',
    image : url + '/img/placegallery.gif'
});
Language resources
TinyMCE does not directly accept strings as labels, but uses its own internal translation mechanism which is not gettext.
-
Create folder
langsunder plug-in base folder -
There create file
en.js
Sample content
tinyMCE.addI18n('en.placegallery',{
    desc : 'Placegallery button'
});
More info
Customizing existing plug-in
The recommended way is to customize TinyMCE
- Re-register plug-in by simply including a plug-in JS code in a separate Javascript file loaded after tinymce.js
- override existing individual TinyMCE files using jbot.
Overriding plug-in
Create a duplicate of plug-in JS file (table.js), register it as a custom Javascript from your add-on resource folder.
TinyMCE overrides previous plug-in registrations with new ones and you can just re-register your own plug-in version to override the existing version.
- Refer it in portal_javascripts
<!-- TinyMCE customizations -->
<javascript
        id="++resource++your.app/tiny_mce_special.js"
        authenticated="True"
        cacheable="True" compression="safe" cookable="True" insert-after="tinymce.js"
        enabled="True" expression=""
        inline="False"
        />
Overriding plug-in resources
Yoiu can also override CSS, HTML (.htm.pt templates)
with
z3c.jbot
as instructed above.
Example:
jbot/Products.TinyMCE.skins.tinymce.plugins.table.js.table.js
Warning
Since there resources are loaded in <iframe> the normal browser refresh does not trigger reload for them. Right click <iframe>, choose Refresh from context menu.
TinyMCE shortcuts
Products.TinyMCE
versions 1.3+ provide a shortcut view in link and image
dialogs. You can add your own site specific shortcuts
here.
The most common use case is a shortcut link a folder which acts as a site image bank. On multilingual sites this folder is
- Below natural language folders in the site root
- Language neutral
These make navigating to the folder using normal means very difficult.
New TinyMCE shortcuts can be registered as global utility via Products.TinyMCE.interfaces.IShortcut interface.
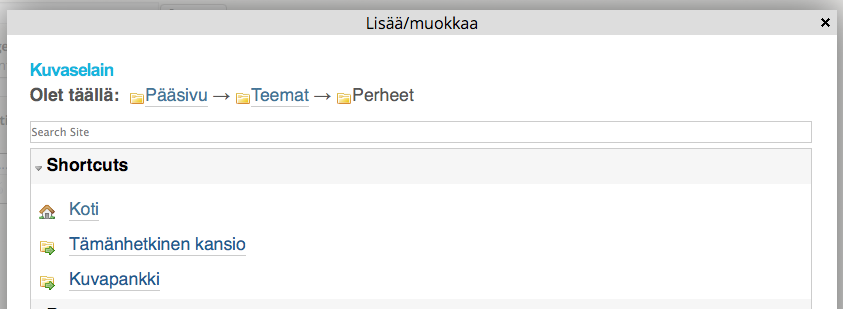
We'll register our image bank as a shortcut into TinyMCE image dialog.
First make sure your add-on is grok'ed.
Then drop in the following file
shortcut.py
file into your
add-on:
from five import grok

from Products.TinyMCE.interfaces.shortcut import ITinyMCEShortcut

class ImageBankShortcut(grok.GlobalUtility):
    """Provides shortcut to the language neutral image bank below language folders """

    grok.name("imagebank")
    grok.provides(ITinyMCEShortcut)

    # This time we don't bother with i18n and assume
    # the whole world understands Finnish
    title = u'Kuvapankki'

    # Portal root relative path
    link = "/kuvapankki"

    def render(self, context):

        # http://collective-docs.readthedocs.org/en/latest/misc/context.html
        portal_state = context.restrictedTraverse('@@plone_portal_state')

        return ["""
        <img src="img/folder_current.png" />
        <a id="currentfolder" href="%s">%s</a>
        """ % (portal_state.portal_url() + self.link, self.title)]
After this you still need to go to TinyMCE control panel
(http://localhost:8080/Plone/@@tinymce-controlpanel) and enable the link button in the settings for
Image Shortcuts.
Note
You might also want to disable TinyMCE inline image uploads through CSS and disable image creation in arbitrary folders on your site. Currently the only way is to override TinyMCE internal CSS files using z3c.bot.