Total Control: The View Template
This page describes how you can control every portion of the HTML output in the content area by creating a custom view template.
Okay, so you've hacked up some custom widget templates, and they're basking in the glory of your newfound power, yet you're still not satisfied. You want to control it all! Well, I've got the information for you!
Archetypes and Type-Specific View Templates
Archetypes automatically recognizes templates with
specific names, and uses the code within those templates
to display your AT-based object. All of this magic happens
within the
base_view
template. To create a custom view template, convert your
type name to lowercase (the name that's listed in
portal_types, or what's returned from
myObject.portal_type). Now, replace spaces with underscores ( _ ). Finally,
add
_view
to the end of the name, and you've almost got a
custom view template.
See below for examples of type names and their corresponding view templates.
Type Name
View Template Name
My Type
my_type_view
SomeTypeV2
sometypev2_view
Now, to remedy that "almost" part of the above paragraph, define one or more of the following macros in your template:
-
header -
body -
folderlisting -
footer
Voila! You've got a custom view template. To see how this works, create a simple template (named appropriately, of course) that contains the following code:
Foo

Foo

Foo

Foo
And, just like magic, you should see, rendered in your content area:

The Infamous "Foo" View
But Wait! Where Are All My Fields?
So now you want your data back. You said you wanted total control, and now you don't want total control. But the point of this tutorial isn't control, it's shine. So, let's explore how to mix and match existing AT templates with your custom code to make a shiny template that renders exactly how you want it.
First, keep the above "Foo" template around. It's very useful when you aren't quite sure which of the four macros is generating a portion of the content area. Simply comment out one or more of the macros, and you'll see which macro generates what portion.
Now, do you remember when I talked about using the
base
template as a starting point for creating custom
templates? Well, that's what we'll do. Let's start by
customizing the footer. The
footer
macro in the following template is copied directly from
'base':
Get the byline - contains details about author and modification date.
Now, let's add something below the byline, say, some important information that applies to every instance of your custom type:
::
Get the byline - contains details about author and modification date. Important information that applies to every instance of my custom type.
Notice that all we had to do was copy the macro from
base
, and add the `` <p>`` tag with some text in it.
Notice that, for example, we could have used
tal:content="here/getCustomFooterData"
in the
</p>
                        <p>
tag if we had defined a
getCustomFooterData()
method in our class.
Now, let's apply this concept to the
body
macro, and play around with displaying fields. First,
we'll start by coping the
body
from
base
into our template.
Now, we'll change up some things by adding a little bit of
code into the macro. First, notice that the
tal:repeat
is repeating over all the fields that are not metadata.
Therefore, if you want to do something for every field,
put it inside this macro. You could (conceivably)
rearrange the macro so that the
tal:repeat
loop is inside another containing block, and put TAL code
before and after the display of the fields, or make use of
the
first
and
last
repeat
variables to achieve the same thing. So, let's do two
things to customize our
body
macro:
-
Surround all the fields with a
</p>
                          <div>
that has a custom CSS class,my-custom-at-body -
Surround each field with a `` <div>`` that has a
different custom CSS class,
my-custom-at-field
These changes, as I'm sure you've figured out, aren't
going to make much of a difference (if any) in the look of
the rendered page without actually writing some custom CSS
code. We now introduce the
css
macro:
<link href="#" type="text/css" rel="stylesheet" />
<div class="my-custom-at-body">
<div class="my-custom-at-field"> </div>
</div>
Now, we can define a CSS stylesheet called
my_custom_css.css
that contains our custom CSS code:
.my-custom-at-body {
    border: thin dashed;
    background-color: #cccccc;
    padding-top: 1em;
}

.my-custom-at-field {
    background-color: #ffffff;
}
Archetypes inserts the
css
macro into the '' tag of the rendered page, making our
custom CSS code, linked files, and includes available
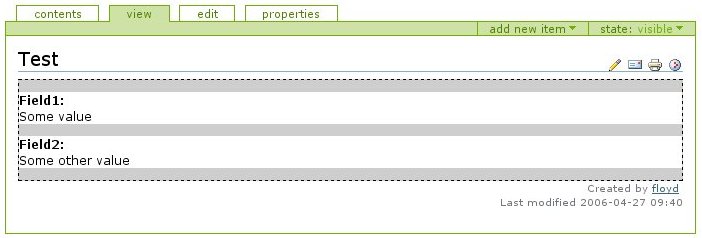
within the page. Our end-result would look something like
this:

Custom Body Macro
If we had created custom widget templates, those would be applied to the rendered page as well.
Customizing Labels
There's still one element of control that we're missing: we still can't override the display of a field label. By customizing the display of the label, we can insert images, links, etc. into the page instead of the default label.
The macro included in our custom view template below will do that magic for us:
<link href="#" type="text/css" rel="stylesheet" />
<div class="my-custom-at-body">
<div class="my-custom-at-field"> </div>
</div>
<label>Now presenting... Field1!</label>
Notice that I've only overridden the default label for
fields labeled "myfield". The
label
macro in
widgets/field
is where the default behavior can be found. The final
result looks like this:

Customized Label
Also, don't forget that you have the power to omit
head,body,folderlisting, and
footer
by simply writing in do-nothing macros into your view
template. Furthermore, you can reach into your object and
retrieve field values without using the widget framework.
